 Impaling
clips are designed to be used in
conjunction with construction adhesive
and support the vertical weight while
the adhesive cures. Impaling
clips are designed to be used in
conjunction with construction adhesive
and support the vertical weight while
the adhesive cures.
Be sure to use an appropriate adhesive
for substrate and wall surface. Some
adhesives may not adhere to uncured
concrete, high gloss surfaces, and
plastics. Mechanical fasteners may
be used to provide additional support.
Wall
surface should be clean and free of
surface obstructions and flat.
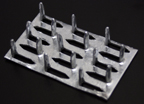
Mount
impaling clips to wall surface using
sheet rock screws, threaded lag shields
or appropriate fastener. Clips should be
4-6” from edges of panel to avoid fabric
on back of panel.
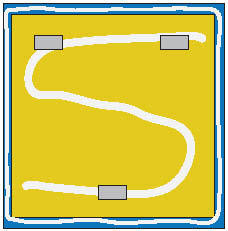
Apply
a “picture frame” of adhesive about 1”
from the edge of the panel and an “S” or
"X" of adhesive in the center of the
panel. For added stability apply glue to
the tips of the clip. Position panel in
the correct location and press onto the
clips using palm of hand or a flat
surface to spread force.
Tip:
Some adhesives can skin over quickly,
therefore, it is important to apply the
adhesive to the panel and wall in a
timely manner. |

